Reference Data Manager (RDM)#
The Arches Reference Data Management (RDM) tool is a core Arches module which enables the creation and maintenance of controlled vocabularies for use in dropdowns and controlled fields within the various Arches Resource forms.
The use of the RDM is restricted to the Reference Data Manager, the person responsible for maintaining the controlled vocabularies. It allows for the creation, update, amendment and deletion of concept schemes (controlled vocabularies). In addition the RDM enables you to export your schemes as SKOS-Compliant XML files as well as the import of external thesauri. For more information on SKOS see http://www.w3.org/2004/02/skos/.
Concept Schemes#
A concept scheme can be viewed as an aggregation of one or more concepts and the semantic relationships (links) between those concepts.
Each controlled vocabulary within the Arches RDM, whether it is a simple wordlist or a polyhierarchical thesaurus, is defined as a concept scheme. [More detail about concept schemes needed here]
Getting started#
In this section you will learn about:
- Adding a new concept scheme
Adding a label to a scheme
Adding a note to a scheme
- Building the scheme
Adding a Top Concept to a scheme
Importing a Top Concept from an external scheme
Adding a child concept
Importing a child concept
Adding an additional Parent Concept (polyhierarchy)
Browsing the scheme using the graph interface
Adding a Related Concept
Adding an image to a concept
Searching for a concept
Deleting a concept
Importing a scheme
Exporting a scheme
Deleting a scheme

Adding a new concept scheme#
In the left hand panel select Add Scheme from the Tools dropdown. The Add Concept Scheme pop-up will appear.
Insert the title [Test Scheme] of the new concept scheme in the ConceptScheme Name field.
Add a brief description of the Concept Scheme in the Scope Note field.
Select the language of the ConceptScheme by clicking in the ‘Language’ field. This currently defaults to en-(US) (English)
Click the Save Changes button. The new concept scheme will appear in the ConceptSchemes panel.
Adding a label to a scheme#
It is possible to add multiple labels to a scheme. This is useful as some schemes may have been referred to by different names previously.
Select the Test Scheme from the left hand RDM panel. The Test Scheme will appear in the right hand panel.
Select Add Label. The Add Concept Label pop-up will appear.
Click in the field marked ‘prefLabel’. The list of label types will appear.
Select the label type.
Select the language of the label by clicking in the Language field. This currently defaults to en-(US) (English)
Click the Save button. The new label will appear in the Labels panel.
Adding a note to a scheme#
It is possible to add multiple notes to a scheme. This allows the reference data manager to add more information regarding the scheme including the scope of what it covers, it’s definition, changes to the history of the scheme, and how it should be used.
Select Add Note. The Add Concept Note pop-up will appear.
Enter the text for the new note in the ‘Note Editor’ field.
Click in the field marked ‘scopeNote’. The list of Note types will appear.
Select the relevant Note type.
Note
Only one note of each type is allowed.
Select the language of the Note by clicking in the ‘Language’ field. This currently defaults to en-(US) (English)
Click the Save button. The new Note will appear in the Notes panel.
Building the Scheme#
Having created the new scheme you should now add the Top Concepts. These will form the framework for the vocabulary and act as the parents for more detailed concepts. This multi-level construction is known as the hierarchy. In a simple wordlist there will by only one level of concepts but in a complex thesaurus the hierarchy can be many levels deep.
Adding a Top Concept to a scheme#
In the Right hand panel select Add Top Concept from the Manage dropdown. The Add Concept pop-up will appear.
Enter the text for the label in the ‘Label’ field.
Enter the definition of the concept in the Note’ field. The list of Note types will appear.
Select the language of the Note by clicking in the ‘Language’ field. This currently defaults to en-(US) (English)
Select hasTopConcept from the ‘Relation from Parent’ field.
Click the Save Changes button. The new concept will appear in the Broader/Narrower Concepts panel.
It may be that other concept schemes similar to the one you are developing may already exist. If this is the case it is possible to import concepts along with their attributes from an external source. By default the RDM can import concepts from the Getty Art and Architecture Thesaurus
Importing a Top Concept from an external scheme#
In the Right hand panel select Import Top Concept from SPARQL from the Manage dropdown. The Import Concept pop-up will appear.
Select Getty AAT from the list of Schemes available.
In the ‘Search for a concept’ field type the text of a concept, eg. houses. A selection of concepts matching the text will appear.
Select the appropriate concept. The Concept Identifier field will be populated with the URI of the concept.
Click the Import button. The new concept will appear in the Broader/Narrower Concepts panel.
Click on the concept. The Concept details panel will appear and the Notes panel will be populated with the external concept’s scopeNote
Adding a child concept#
Select the concept, which will act as the parent for the new child concept, by clicking on it. The Concept details panel will appear
In the Right hand panel select Add Child from the Manage dropdown. The Add Concept pop-up will appear.
Enter the text for the label in the ‘Label’ field.
Enter the definition of the concept in the Note’ field. The list of Note types will appear.
Select the language of the Note by clicking in the ‘Language’ field. This currently defaults to en-(US) (English)
Select narrower from the ‘Relation from Parent’ field.
Click the Save Changes button. The new concept will appear in the Broader/Narrower Concepts panel.
Click on the new concept. The Concept details panel will appear and the Notes panel will be populated with the concept’s scopeNote
Importing a child concept#
Select the concept, which will act as the parent for the new child concept, by clicking on it. The Concept details panel will appear.
In the Right hand panel select Import Child from SPARQL from the Manage dropdown. The Import Concept pop-up will appear.
Select Getty AAT from the list of Schemes available.
In the ‘Search for a concept’ field type the text of a concept, eg. castle. A selection of concepts matching the text will appear.
Select the appropriate concept. The Concept Identifier field will be populated with the URI of the concept.
Click the Import button. The new concept will appear in the Broader/Narrower Concepts panel.
Click on the concept. The Concept details panel will appear and the Notes panel will be populated with the external concept’s scopeNote
Adding an additional Parent Concept (polyhierarchy)#
Some concepts may have more than one parent for example a castle is a type of fortification but it is also a domestic building. This situation where there are more than one possible parent concepts is called polyhierarchy.
Select the concept, which you want to add a parent concept to, by clicking on it.
Select Manage Parents from the Manage dropdown. The New Parent Concept pop-up will appear.
In the ‘Search for a concept’ field type the text of the parent concept you are going to add, eg. domestic buildings. A selection of concepts matching the text will appear.
Select the appropriate concept.
Browsing the Scheme using the graph interface#
For any Concept the Broader/Narrower Concepts panel defaults to the tree view and shows a concept’s immediate broader (parent) and narrower (child) concepts. The scheme may also be browsed using the graph interface.
In the Broader/Narrower Concepts panel click Show graph. The graph view will appear centred on the concept you have chosen.
Navigate the graph by clicking on the ‘nodes’ (the circles). Clicking on a node will bring up a dialog box with the concept label and a ‘x’ symbol.
Click on the label to jump to the details for a concept
Adding an image to a concept#
Searching for a concept#
Deleting a concept#
Deleting a concept is simple in Arches but car should be taken that the concept has not been used in any recording forms. If a concept has been used a warning message will appear informing the Reference Data Manager that all instances of the concept in use must be replaced with an alternative concept before the concept can be deleted. If the Reference Data Manager is certain the concept has not been used then the concept may be deleted using either of the following methods.
Method 1: Tree view#
Identify the concept’s parent concept and bring up its details.
In the Broader/Narrower Concepts panel make sure the tree view is visible (This is the default view).
Click on the ‘x’ symbol next to the concept to be deleted. The Delete a Concept pop-up will appear.
Note
A warning message ‘By deleting this concept, you will also be deleting the following concepts as well. This operation cannot be undone.’ will appear. If you do not want to delete the concept click the No button.
Click the Yes button. The concept is deleted (along with any of its children).
Method 2: Graph view#
Identify the concept’s parent concept and bring up its details.
In the Broader/Narrower Concepts panel make sure the graph view is visible by clicking on Show graph.
Click on the node for the concept to be deleted. A dialog box with the concept label and a ‘x’ symbol will appear.
Click on the ‘x’ symbol next to the concept to be deleted. The Delete a Concept pop-up will appear.
Note
A warning message ‘By deleting this concept, you will also be deleting the following concepts as well. This operation cannot be undone.’ will appear. If you do not want to delete the concept click the No button.
Click the Yes button. The concept is deleted (along with any of its children) and the node will disappear.
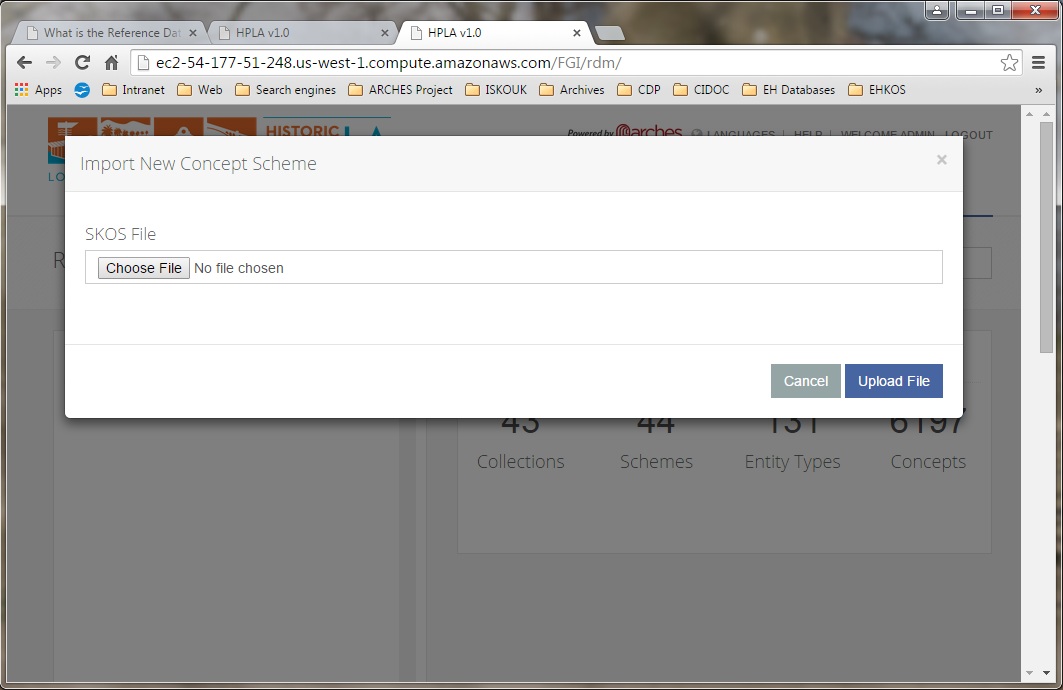
Importing a scheme#
In the left hand panel select Import Scheme from the Tools dropdown. The Import New Concept Scheme pop-up will appear.
Click the Choose File button. The Windows Explorer panel will appear.
Navigate to the file to be uploaded.
Note
This file should be a SKOS file in any format parseable by Python’s RDFLib. Examples include RDF/XML, N3, NTriples, N-Quads, Turtle, TriX, RDFa and Microdata.
Click Open. You will be returned to the Import New Concept Scheme pop-up and the name of the file will have populated the form.
Click Upload File. The number of Concept Schemes will have increased by 1 and the imported concept scheme will appear in the ConceptSchemes panel.
Exporting a scheme#
In the left hand panel select Export Scheme from the Tools dropdown. The Export Scheme pop-up will appear.
Click in the Select Scheme to Export field. The Concept Scheme dropdown menu will appear.
Select the scheme to be exported and click on it. The scheme name will populate the field.
Click the Export button. A new browser tab will appear containing a SKOS-compliant XML export of the scheme.
Right click on the file and select Save as… from the pop-up menu. The Save as panel will appear.
Choose where you want to save the file by navigating through the folder structure.
Give the file a relevant name and click the Save button. The file will be saved to the selected location.
Deleting a scheme#
In the left hand panel select Delete Scheme from the Tools dropdown. The Delete Scheme pop-up will appear.
Note
A warning message stating ‘You won’t be able to undo this operation! Are you sure you want to permanently delete this entire scheme from Arches?’ will appear. If you do not want to delete the scheme click the Close button.
Click in the Select Scheme to Delete field. The Concept Scheme dropdown menu will appear.
Select the scheme to be deleted and click on it. The scheme name will populate the field.
Click the Delete button.
Note
The warning message will appear again along with a list of all of the concepts to be deleted. If you do not want to delete the scheme click the Close button.
Click the Delete button to confirm deletion. The scheme is deleted along with all its concepts.