Managing and Hosting IIIF Servers#
Arches is configured to use Cantaloupe if you want to host images made available via the IIIF presentation API. Below is a simplified setup guide. The full Cantaloupe setup documentation is here
Setting Up Cantaloupe#
Download and extract/unzip the cantaloupe source code from among these releases . We recommend the latest release of version 4.
In a directory containing all the contents of the downloaded source code, make a copy of
cantaloupe.properties.sampleand name itcantaloupe.properties. When hosting images locally (relative to your arches project), change the value for argument:FilesystemSource.BasicLookupStrategy.path_prefixto the asbolute path of wherever your uploaded files are located, for example/home/ubuntu/project/project/uploadedfiles/.
“Lookup Strategy” should already be set to “BasicLookupStrategy”.
Note
Other strategies (such as delegation) can be configured depending on your desired implementation.
Ensure that the argument
CANTALOUPE_DIRin your project’ssettings.pyfile isos.path.join(APP_ROOT, "uploadedfiles")if your project’s uploadedfiles directory is where images will be stored, otherwise point to the appropriate location.Run the Cantaloupe server (either using the
javacommand or some service or process manager; see the “Running” section of Cantaloupe docs)
Note
Remote hosting of Cantaloupe server, the manifest.json files, and image files are all still in development.
Creating IIIF Manifests / Image Services#
The IIIF Manifests each represent a collection of at least one image (called a “canvas”). It is called an Image “Service” because the cantaloupe server enables the user to zoom and dynamically view the image.
Navigate to the Image Service Manager in the Arches UI and select at least one image to create a new service. If you do not see the icon for Image Service Manager in the left-hand navbar, you may need to update the entry in the Plugins table of your database like so:
sudo -u postgres psql -d [test_project] -c “update plugins set config = '{"show":true}' where name = 'Image Service Manager';”
Now that an Image Service (referred to as a “Manifest”) exists, it will be available for any user to create Annotation data. You can edit this Image Service in the Image Service Manager to upload additional image files or add metadata.
When a resource is edited and a tile saved to that card on that model, if the file is an image type (i.e. a .tiff, .tif, .jpg, .jpeg, or .png) a record in the iiif_manifests table in the database will be created pointing to a manifest .json file that will render the image file from cantaloupe into the IIIF Viewer card (see below).
IIIF Viewer / Annotation data#
To make use of IIIF imagery, a resource model must have a semantic node configured to use the “IIIF Card” selected for “Card Type”.
Inside this card/nodegroup, add a child node and select “annotation” datatype. To include other data along with this annotation, (e.g. text, date, or related resources) create sibling nodes of those datatypes, ensuring they are still the children of the semantic node designated with the “IIIF Card”.
When creating a tile for this card in the resource editor, the user will first be prompted to select a IIIF Manifest from a dropdown list. You should see any IIIF Manifests created from the above process.
Note
A single tile for a IIIF card could contain multiple features (point, line, polygon) as part of the annotation data, but commonly you would also want nodes of other datatypes (for ex: string) grouped into this IIIF card; thus to make multiple tiles with different values on the same resource instance, you need to check “Allow Multiple Values” on the IIIF card in the Card Manager.
Populating IIIF Manifest Dropdown Lists#
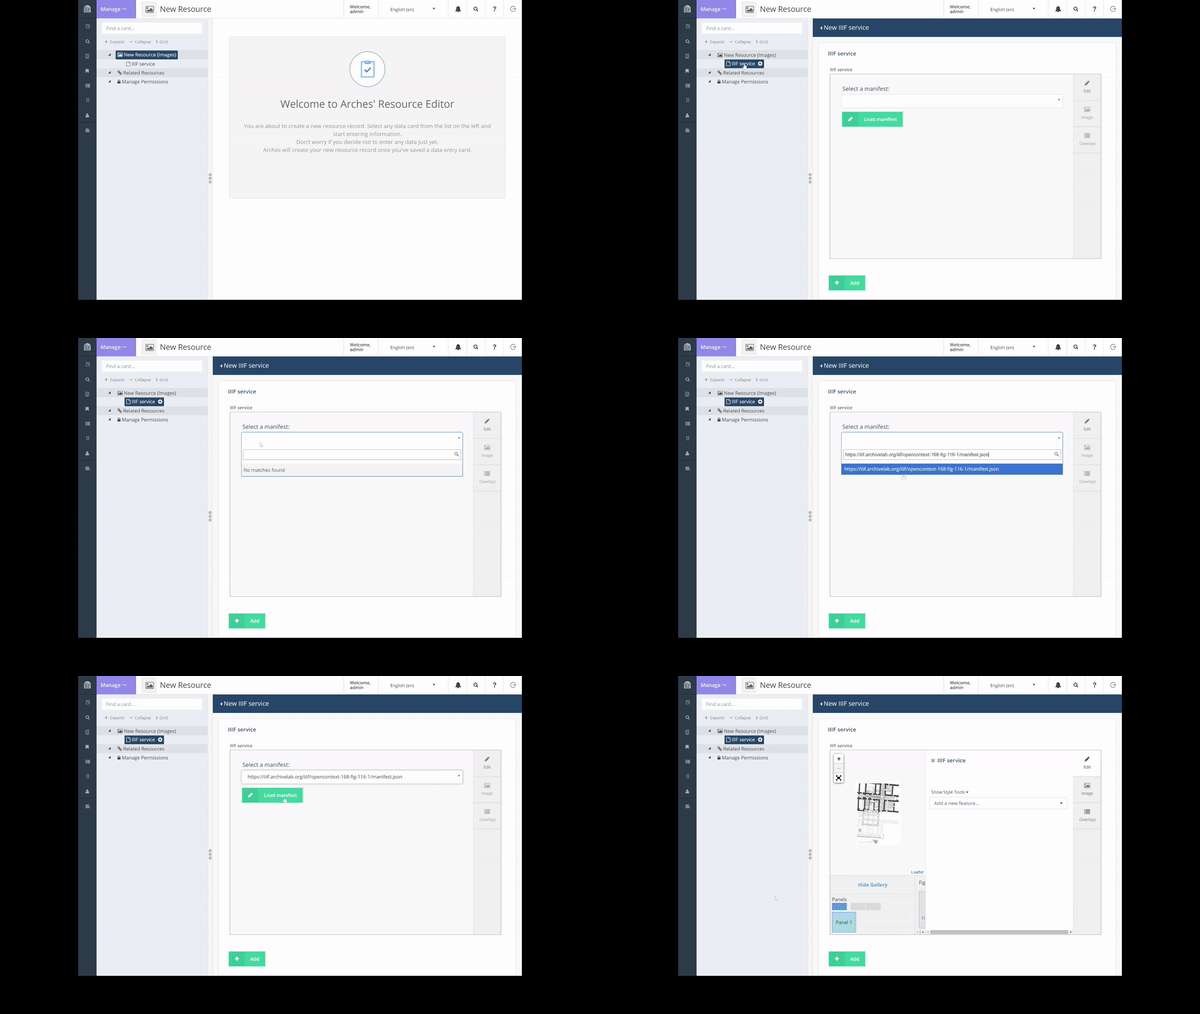
A dropdown list provides users with options for selecting between IIIF manifests when they use the resource editor. A user can also add a new IIIF manifest that exists on a remote server by pasting the URL to that manifest (the URL will point directly to the remote server’s manifest JSON resource) into the input/search box of the dropdown list. See the animation below for an illustration:

One can use SQL to pre-populate the list of IIIF Manifests. The following SQL inserts will pre-populate the IIIF manifest dropdown list:
insert into iiif_manifests (label, url, description) values ('IIIF Manifest of Gospel Book', 'https://media.getty.edu/iiif/manifest/a628a212-a325-406c-aa4d-c43eeb393ec5','accession number: 83.MB.69, TMS ID: 1571, UUID: 8c6116d5-09f6-4416-8d15-1804c9337c65');

insert into iiif_manifests (label, url, description) values ('IIIF Manifest of Saint Matthew Seated', 'https://media.getty.edu/iiif/manifest/028b269e-054f-4d39-83b9-6b207707731d','accession number: 83.MB.69.9v, TMS ID: 3275, UUID: 4093369e-678b-41fc-a7e9-a5fef60c7385');

insert into iiif_manifests (label, url, description) values ('IIIF Manifest of The Transfiguration', 'https://media.getty.edu/iiif/manifest/a91a88a3-ca07-480f-b749-8e1c28d4f040','TMS ID: 3278, UUID: 601d907b-2941-4724-9f14-7b7d22f2be63');
- More information:
General information on using IIIF (Cantaloupe version 3 only, but still useful): https://iiif.github.io/training/intro-to-iiif/
Cantaloupe Documentation: https://cantaloupe-project.github.io/manual/4.1/getting-started.html
IIIF Presentation API Documentation: https://iiif.io/api/presentation/2.1/
IIIF Image API Documentation: https://iiif.io/api/image/2.1/